
app_rpt is a software app written in C for the open source ASTERISK PBX that will basically turn Asterisk into a voice switch for radio equipment. A repeater controller/remote base with phone patch and internet linking with echolink and/or allstarlink and or private linking between repeaters and/or phone systems.
The primary group of folks using this as a “great ham repeater switch” would be the ALLSTARLINK.ORG group. However, documentation is sparse and some that you find on the net is not fully explained. I could never find the info I was looking for to do a set-up of remote bases and found many broken links to what looked like what I needed. I found a alternative way… looking at the source code. (located in /usr/src/astsrc/asterisk/apps/app_rpt.c)
For those of you looking to get up and running, I will note it does take a little time and even more if you have no LINUX, ASTERISK experience and/or REPEATER experience ( I hope you realize that if you strike-out on all three, it will take some time to absorb all of this no matter what).
I will attempt to save you weeks/months of frustration trying to get this to run so you can understand how it works as it is running. For me having plenty of years of ASTERISK and REPEATER, LINUX and PROGRAMMING experience, this app_rpt application was giving me a quite a few head aches for a nearly a week to set-up my 4 repeaters and remote bases. Mainly due to no/poor documentation.
In a effort to promote better documentation, I will try to lay-out the fastest set-up even for those that have no experience. But more important, in later pages, give you better doc’s on setting up the “.conf” configuration files.
In our quickie install, we are using the allstarlink.org quick setup but you are not obligated to use the allstarlink system. We are just making a easy quick basic set-up of your first machine. Although you should consider the benefits of a wide linking system. We are assuming that you do not care to explore all your options to see what is best for you in the first place so these pages are in no way advice, even though they may contain some specific advice about specific items.
Our example system set-up is probably the easiest to do with less money and less hardware and pretty reliable. All be it, this may not be the configuration you want to end up with. But this gives you a chance to learn how it works and then you can decide what works for your needs.
This quicky is intended for a PC and the ACID install. There are many other options, one of which is a set-up on a beagle-board-black (BBB) by WA3DSP and can be found at http://www.crompton.com/hamradio/BeagleBoneBlackAllstar/BeagleBoneBlack.pdf
Do not hook this up with a actual repeater until you have configured and tested it properly and know how to issue commands for control.
-SO HERE IS THE SKINNY-
First…
You will need/want a newer computer with
a dual-core cpu and preferably one that has no ps2 style ports but has 6 usb 2.0/3.0 ports on it. Sorry to say, Intel boards with Intel chipsets do work best but others will most likely be fine.
2gb ram, 40gb hdd & a cd-rom
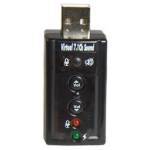
USB Dongle with cmedia cm108/ah
one or more USB sound cards with a cm108/cm108ah chipset (ebay $4 – 8 ea)
additionally, to prevent you from needing to hack the USB sound for cor/ptt control, you should pick-up a parallel port interface output board. The best would be the type that are advertised on ebay for use with CNC control and have “opto-coupled transistors” on the outputs. This isolates/buffers your machine from a mishap on your input/output connections and/or lightning. I see good ones on ebay that use the opto-couples for $25 -35 with a cable. You do not have to have this but it is worthwhile to have and you can’t build one for that price. A mishap of sending to much voltage to one of the
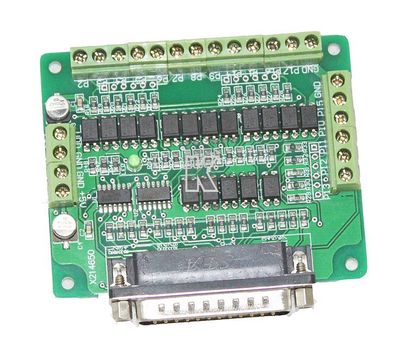
Parallel Port Breakout card with Opto-Coupled Transisters on output.
parallel port pins directly can trash the machine as compared to just burning out one of the opto-coupled transistors ($1-5). Not all mainboards have proper buffering for what we use them for. Please, Take it from my experience in ’95 when I built a bunch of repeater controllers in DOS Box’s and built a card just like this for protection. Use One ! It makes a nice neat,clean hook-up with the terminal strips and pins are well marked preventing further mistakes/shorts.
It helps while getting started to have a second machine with FILEZILLA FTP Client program to do some quick edits on the “.conf” files on a windows/linux machine and PUTTY ssh program will allow you to remotely run/edit the system. Find them both at sourceforge.net
Also, 2 windows programs called 3CX phone a sip softphone and iaxRPT. You can also get the 3CX phone as a iphone/ipad/android app. Once configured in your radio pbx, they will allow you to test and run the system even without any radio equipment connected.
Yes, you can use less computer but depending on what you do, you may regret doing this with less computer if you create more than 1 or 2 nodes. I say this for varying reasons that are to much to print here.
In advance, something to think about is, unless you have a static ip address, if you are going to run this at a remote site with internet connection, you “may” want to set your router for a dynamic dns connection so you can get in and re configure it remotely. (not explained here) . The system, by default, can play the IP back to you on the air.
Go to allstarlink.org and sign-up for account. When this has been checked and authorized (day or two), sign-up for a server and one node(also takes a day or two). Once this has been authorized and you get a node number, download the ACID linux distribution iso and burn the cd. This is a centos (community enterprise os) server distribution and is very lean, clean and stable even if not the latest version (stay with the program and do not install newer OS than is in the distro). It’s a lot like RHEL if you are familiar with that.
While you may be waiting for parts to arrive, please set-up your first node/repeater/remote base on your first node at allstarlink.org. After you think you have a descent setup go to the next step (This does not need to be exact at this point as you will edit your files that are generated, by hand at a later time) .
Setting up the PC machine….
First and foremost, remove all unneeded cards and USB devices except for your keyboard. Then get into the machines BIOS and reset to factory defaults. SAVE/EXIT and upon reboot and enter BIOS again and set-up what it needs for your drives etc and disable any built in stuff you do not need. BUT DO NOT DISABLE network, video, parallel port or sound and do not disable serial port if you will be using it for a hf remote via rs232 “CAT interface”. This is to free and reset possible irq handling for the Plug and play system… don’t skip this first step, it may cause you grief / head scratching later. Set the pc boot order for 1st-cd-rom & 2nd-hdd.
You might take a note as to what address the parallel port is assigned… i.e. 378,278 etc. If your bios gives you a choice of manual configuration, choose 378 for your first port unless you have good reason not to.
What you have now done is clear problems that may have been buggering the PNP system up most especially for the irq sharing. You may have had potential problems without knowing it. Most important if using multiple nodes. Even at this day and age, Plug-N-Play does still have its problems in certain situations especially for usb handling and mainly because of irq shares and poor handling of them and manufactures that do not adhere to PNP specs.
Set-up your router:
If you intend to set-up echolink, you need to set port forwarding for udp ports 5198 and 5199 to your radio pbx’s ip. Even though most 2.0 versions of echolink software will revert to tcp port 5200 when udp ports fail, some nodes are on older software and (at the time of writing) iPad/iPhone apps will not revert to tcp 5200 when udp ports fail to connect.
If you intend to use allstarlink or use direct private network between nodes, you want to forward udp port 4569 to your radio pbx ip.
Make sure your machine has adequate internet access when starting the next steps (plug in Ethernet).
Now install the ACID distribution cd keeping in mind that the system will need to boot to the cd and it will partition and format the hard drive without asking as it installs (everything on drive will be lost).
It installs Centos OS from the cd and goes to the internet for the latest app_rpt distribution and supporting files.
At the end of the distributed install, it will ask you to create a system password. Make it at least 12 characters of letters and numbers and punctuation. Write it down in advance and don’t loose it. Then it will ask you for your user name and password for your allstar system to be able to download the config files you made when you set-up your node online. This will give you a basic framework to get started with. It will then ask you to install the USB FOB (usb sound) dongle as the system reboots so have it handy.
Next Step…
Check the radio pbx’s ip address & write it down. (use router to see what ip’s are assigned and connected for your radio pbx)
For those of you that have good linux experience, I would suggest at this point you install webmin to access/edit/manage your machine. The following is for all others.
Fire up the second machine that’s connected to your network with filezilla/putty/iaxrpt installed
A word of caution if you edit app_rpt/system files on a windows based machine:
edit only “.conf files” .
This is because your system editor/notepad/wordpad on a windows machine handles carriage return and line feeds differently than a linux/unix system. But because the way the .conf files are read into the system, it does not matter. Do not edit script files ( .sh ) or system crontab using a windows editor. you will be lost and confused when things don’t work and you can’t see why when it all looks right.
Those of you that are old DOS hounds will be able to easily convert to editing in linux by using “vi” or “nano” for editing files. After going to the directory, just type “vi filename.conf” or “vi /path/to/directory/filename.ext” .
One other note for those new to linux: When you log in and see you are in “root”, ” root ” is not the top of the directory tree, it is a directory.
Type the following to get a quick demo:
cd / brings you to the top of tree
ls list files/directories
cd /etc/asterisk/
ls *.conf list files with extention .conf (the old wildcards work here).
Old dos folks probably have a grip on this now but I can’t teach linux in this article.
Once editing a file in vi, you need to hit your insert key to actually change text and escape when done to enter a command of ” : ” and then “quit” to exit without saving or :exit to exit and save your work.
The following is for the folks yet intimidated by linux and want to get moving. Others go to next page link at bottom.
Start your filezilla ftp client on your second machine and set-up a new site. Enter your ip details and port to 222 (change this later), set to ssh mode and normal log-in and use root for username and then your password you created for your system during initial setup.
Since all of the files we are editing are in the directory /etc/asterisk/ , we can backup our files on this second machine by ftp transferring them back to a known directory you see in the left pane.
When you hit the connect button, you will see a directory tree on the right. Click on the top of that tree to see all root directories, then double click “etc” dir and when that opens up double click on asterisk sub-directory.
Now you can see all of the files that make up the user editable configuration files in the pane below the tree.
If you right click the ” extensions.conf ” file a submenu appears / select view-edit and your system editor will load with that file to edit.
When done editing, save the file (normal) but once you do go directly to filezilla as it will ask you to upload the changed edited file to the server it came from and select yes and check done editing.
This is the procedure for editing all .cong files for those yet to intimidated by linux. (you will have to change that eventually)
and go toEDITING / CONFIGURING app_rpt FILES and OPTIONS